This tutorial is as brief as possible, if you are interested in more detailed information or in the implementation, please consult the documentation or the technical documentation, respectively. Unless mentioned here, there is no need to change any settings on the interfaces.
Please note that projects created without a personal account can be deleted by anyone unless you decide to make them private. In this case, you will have to use special URLs to work with your data. In any case, we delete data uploaded as guest (i.e. without a login) periodically (they are kept for at least 2 months). If you want to work with real data, you should hence consider to create a personal account.
If you are only interested in the output of AutozygosityMapper, you don't have to upload genotypes first. Simply open the query projects page and select one of the existing public projects and move to section 3 of this tutorial. The sample files used in this tutorial are also there, under the intuitive names 'VCF-Tutorial_Carpenter', or 'Tutorial_SNP', respectively. Click here for VCF genotypes, here for the Autozygosity analysis for VCF genotypes or here for SNP chip genotypes to access the project directly and continue with section 4.
First, you must upload genotypes. Please open the upload page.
For this tutorial, a sample VCF (variant call format) file (with a homozygous region on chromosome 6) exist - download it here.
For this tutorial, sample genotypes (with a homozygous region on chromosome 7) exist - download them here.
Don't check the access restriction button unless you work with a personal account.
Please delete your genotypes when you've finished the tutorial.Open the analysis page (unless it's already open).
Open the query projects page (unless it's already open) or click here for VCF genotypes, here for the Autozygosity analysis for VCF genotypes or here for SNP chip genotypes to access the sample data directly.
After selecting the respective analysis, the homozygosity scores will be displayed as a genome-wide bar chart. Scores higher than 60% of the maximum score will be displayed as red bars to highlight them. Below the bar chart, all scores above 60% of the maximum are listed (sorted by their score) and direct links to these regions are provided. On top of this table, 'broad' regions are displayed - in these, smaller decreases of the score within a homozygous region are neglected. At the bottom of the table, 'narrow' regions with sharp limits follow. If you expect some degree of heterozygosity, you should consider the 'broad' regions.
Below the regions, links to GeneDistiller and export options are displayed:Click here for VCF genotypes, here for the Autozygosity analysis for VCF genotypes or here for SNP genotypes to access the sample data directly.
After clicking on a chromosome, the view is reduced to this chromosome. In our sample project, you can clearly see a relatively wide and high homozygosity score and, above this, in the small observed/expected ratio a clear surplus of homozygous genotypes (only red bars on top of the baseline). You can further zoom into the region by
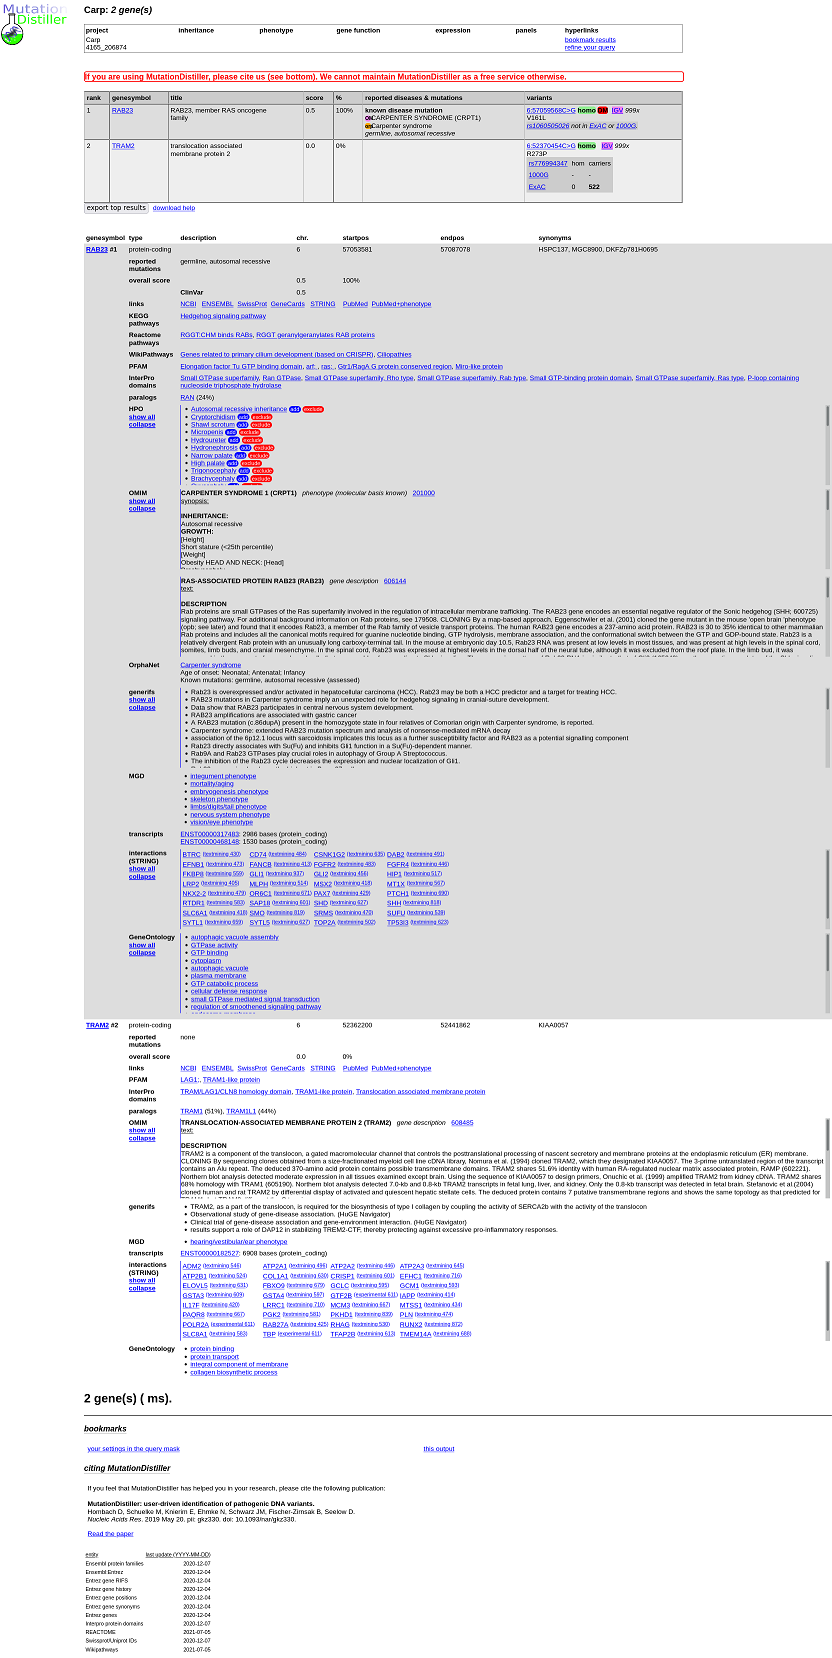
In this view, the single genotypes within your selected region are shown as colour-coded boxes. Each column stands for a SNP (sorted from left to right by its position), each line for a sample. Note that affected individuals are displayed on top and controls at the bottom, with a small free space between them. A grey box stands for an unknown genotype, blue for heterozygosity and different shades of red reflect the length of the homozygous strech if a genotype is homozygous. Genotypes homozygous for the minor allele (based on this study!) have a black diagonal line. A box is drawn around the homozygous region and the limiting markers are displayed below the genotypes. Further below, a link to our candidate gene database, GeneDistiller, is included. If you want to search for a candidate gene within your region, simply click on GeneDistiller. If you want to change the region, follow the instructions below.
The GeneDistiller start page will now open with your limiting markers filled in as limits. To learn about the functions of GeneDistiller, either play around (it's quite intuitive) or read its manual.
If you want to search for a causal variant directly, simply click on “Mutationdistiller” (only possible for VCF genotypes, not for SNP arrays).
A page will now open, which provides an overview about the amount of variants within your selected region and how these variants were rated by the MutationTaster. Further information about these variants are shown by clicking on “Display”-link in the Results section and can be downloaded in tsv format (“Download TSV”-link). Click here see the results of the MutationTaster/MutationDistiller analysis . You can change the search settings here.
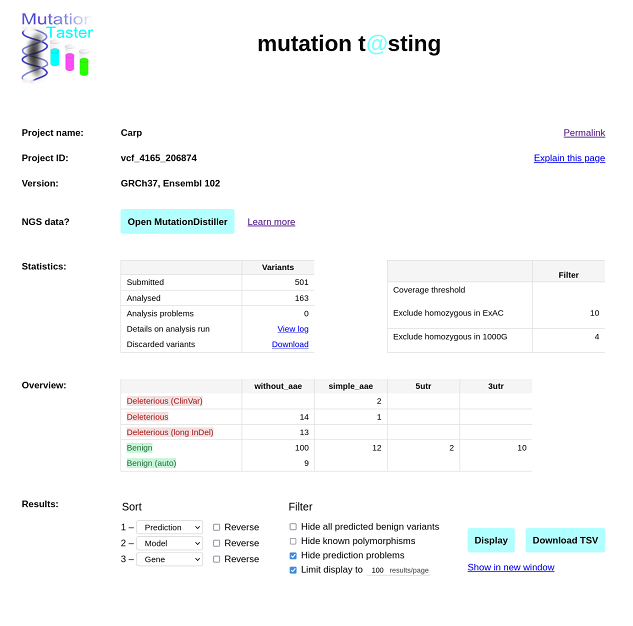
Click the “Open MutationDistiller”-link to search for potential disease mutations.
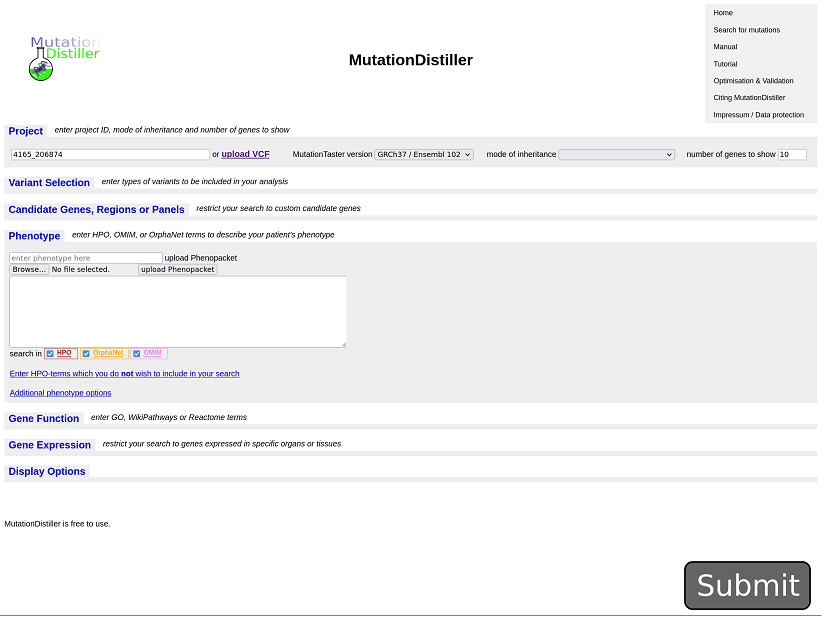
You could now give phenotypic information or select virtual panels from GEL PanelApp but you can also click on submit to analyse all variants...:
Go to the delete your data page. All proejcts and analyses owned by you will be displayed.
You have now completed the tutorial. If you want to analyse 'real' genotypes and want to hide them from
the world (and make them public when your manuscript has been accepted), you should create a personal account.
Go to the create profile page and
enter your name, an e-mail address,
your organisation and select your login name and a password. You will be logged in automatically (your
browser must accept cookies for this function).
More about the publication and the exchange of your data can be found in the documentation.
You can use every function of AutozygosityMapper, except for sharing data, without a login.
This tutorial is meant only as a brief introduction to AutozygosityMapper. Please read the documentation if you are interested in the elements not mentioned here. And if any questions remain unanswered, don't hesitate to ask us (e-mail to dominik.seelow (at) charite.de). We would also appreciate hearing of your experiences, bugs you discovered, and suggestions to improve this application.